
Quick Summary
Foam earplugs are cheap and convenient, but they rarely fit right. For anyone who relies on ear protection every day, a bad fit can be a dealbreaker. Custom-molded earplugs solve that by matching the exact shape of your ear canal.
This month, we take you behind the scenes of how Shoreline Hearing Center creates those molds, step by step, in a single in-office appointment.
In this article, we will explore:
- Why custom-molded earplugs fit better and last longer than store-bought options
- What happens during the otoscopic exam and why it matters for safety
- How the impression material is placed and what it feels like
- Why the curing process only takes a few minutes
- What styles of custom earplugs are available and how long they take to arrive
Behind the Scenes: How We Make Custom Earplugs at Shoreline Hearing Center
If you’ve ever tried to sleep with foam earplugs, worn them out at a concert, or used them during your workday, you know that sometimes they fit well, and sometimes they don’t. For some of our patients, one ear is a lot different than the other, so one side can be difficult for them to insert properly. For people who rely on ear protection daily (musicians, hunters, swimmers, industrial workers, light sleepers), that kind of discomfort can be a complete deal-breaker.
That’s where custom‑molded earplugs come in. Custom plugs are crafted to match the exact curves and contours of your ear canal. The result is something that’s comfortable, durable, and reliable enough to wear for hours without even thinking about it.
The best part? Getting that perfect fit is quick, painless, and can be done easily during an in‑office appointment at Shoreline Hearing Center right here in Muskegon, Michigan!
In this blog, we wanted to give you a behind‑the‑scenes look at how we create custom ear impressions and explain why each of these steps is so important.
Step 1: The Otoscopic Evaluation (Safety First)
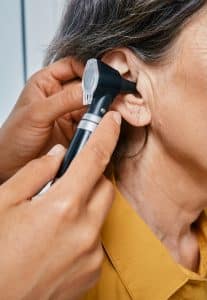
Before we place anything in your ear, we always start with a simple otoscopic exam. Using a small lighted tool called an otoscope, we take a look inside your ear canal to make sure everything is looking healthy and ready for impressions. We’re checking for things like:
- Excessive earwax
- Signs of irritation or infection
- Anatomical differences that may affect the impression
If we spot earwax that needs to be removed, we can take care of that right during your appointment. This step ensures that your impressions are both accurate and safe, and it’s one of the main reasons custom earplugs should always be made by a licensed audiologist.
Step 2: Placing the Otoblock
Once your ear canal is cleared and ready, we gently place a tiny foam or cotton block called an otoblock into your ear. It’s attached to a small string so we can remove it easily later.
The otoblock sits deep in the canal, but not near the eardrum. It acts as a soft barrier to keep the impression material exactly where it needs to be. Most patients describe this step as feeling like a little bit of pressure, but not uncomfortable.
Step 3: Mixing and Injecting the Impression Material
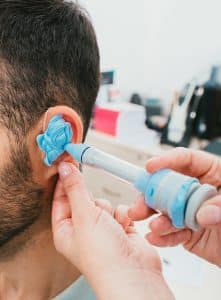
Next comes the part most people find fascinating: the impression material. We mix a two‑part silicone putty that begins to firm up as soon as it’s combined. Using a special syringe, we slowly and carefully fill your ear canal with the soft material until it reaches the outer ear.
As this happens, you will probably feel a cooling sensation and a gentle fullness, and notice that the world suddenly becomes very quiet. This is completely normal; the material we use temporarily blocks sound, almost like being underwater.
Step 4: The Curing Process
Once the impression material is in place, you get to sit back and relax for 3-5 minutes while it cures. The silicone will firm up into a rubbery mold that captures every curve of your ear canal.
For musicians, vocalists, or anyone who uses their jaw frequently while working or performing, we may ask you to hold a small “bite block” between your teeth. This is designed to keep your jaw in a consistent position, ensuring your earplugs fit well even if you’re singing or talking.
Step 5: The Reveal and Next Steps

When the material has fully cured, we gently twist and remove the impression. It often makes a soft “pop” sound, which is a surprisingly satisfying moment for many of our patients.
After it’s removed, you’ll get to see a detailed replica of your ear canal. We send it off to a specialized lab where your custom earplugs are crafted from durable, medical‑grade silicone.
Turnaround time for this is typically 1–2 weeks, depending on the style you choose. There are a few to choose from, like musician filters, sleep plugs, swim plugs, hunting plugs, or industrial protection. If you’re not sure, don’t worry. We are here to help you choose the best option!
Are You Ready to Upgrade Your Hearing Protection?
Custom earplugs are a long‑term investment in comfort, safety, and hearing health. If you’re ready to experience the next-level comfort of custom‑molded protection, we’d love to help!
Call us at 231-755-0552 or book your appointment online with our team today!
FAQs About Custom Ear Plugs
How are custom earplugs different from foam or store-bought earplugs?
Foam and off-the-shelf earplugs are built to a generic size and shape, so fit varies from person to person, and even from one ear to the other on the same person. Custom-molded earplugs are made from an impression of your actual ear canal, so they fit precisely, stay in place, and are typically more comfortable to wear for extended periods.
Does getting an ear impression hurt?
No. The process is painless. You may feel some gentle pressure when the otoblock is placed and a cooling, full sensation when the impression material is injected, but neither step causes pain. Most patients describe it as simply unusual rather than uncomfortable.
Why does an audiologist check my ears before taking an impression?
The otoscopic exam checks for excess earwax, irritation, infection, or anatomical differences that could affect the impression or make the process unsafe. This step is also why custom earplugs should always be made by a licensed audiologist rather than a non-clinical provider—it catches issues before they become a problem.
How long does it take to get custom earplugs made?
The in-office impression appointment itself takes just a few minutes, including a 3–5 minute curing period. After that, your impressions are sent to a specialty lab, and turnaround for the finished earplugs is typically 1–2 weeks, depending on the style you choose.
What types of custom earplugs are available?
Shoreline Hearing Center offers several styles depending on your needs, including musician filters, sleep plugs, swim plugs, hunting plugs, and industrial hearing protection. If you’re not sure which is right for you, the team can help you choose during your appointment.